As the heart of the home, the appearance of your kitchen cabinets plays an important role in defining its overall appearance. The visual appeal of kitchen cabinets can become worn, faded, or outdated over time, leading you to wonder whether you should replace them completely or restore them to their former state. Further, the restoration and staining of your cabinets is an economical and efficient method of Kitchen Remodeling in Oakland. This guide will show you how to revive your old cabinets and showcase stunning before-and-afters.
Why Restore Kitchen Cabinets?
Before we discuss tips for refinishing your kitchen cabinets, it is worth exploring why it is worthwhile to restore your kitchen cabinets
-
Cost Effective:
The cost of replacing kitchen cabinets can be significant, often constituting a substantial portion of the budget for a kitchen renovation. You can save thousands of dollars by replacing your existing cabinets with this cost-effective alternative.
-
Sustainability:
Restoring your kitchen cabinets is an environmentally friendly option. It reduces the need for new materials and minimizes waste, which contributes to the sustainability of home improvement projects.
-
A Customized Approach:
Having your cabinets restored allows you to customize their appearance. There are a number of stain colors, finishes and hardware choices you can choose from, allowing you to create the exact look you want for your kitchen.
-
Maintaining High Standards:
If your cabinets are well-built and in proper structural condition, you do not need to discard them. By restoring them, you can revitalize their appearance as well as preserve their quality and functionality.
Here are 8 tips that will make your kitchen cabinet refinishing a huge success:
Having gained a comprehensive understanding of the significance of restoring your kitchen cabinets, let’s take a look at the step-by-step process of restaining them for a fresh and updated appearance.
-
Evaluate the Cabinets and Manage your Equipment
- The first step is to inspect your cabinets in order to determine their condition. Take note of any damage, loose hinges, or structural issues that need to be addressed. Before you begin the refinishing process, make a list of any repairs that need to be made. For this project, you will need the following supplies:
- Screwdriver
- Sandpaper (various grits)
- Wood filler
- Putty knife
- Tack cloth
- Stain
- Polyurethane finish
- Paintbrushes
- Painter’s tape
- Drop cloths
- Gloves
- Safety goggles
- Respirator mask
- The first step is to inspect your cabinets in order to determine their condition. Take note of any damage, loose hinges, or structural issues that need to be addressed. Before you begin the refinishing process, make a list of any repairs that need to be made. For this project, you will need the following supplies:
-
Removing Paint or Varnish from Cabinets
- If your cabinets are painted, remove the paint with a chemical stripper. If your cabinets are stained or varnished, either clean the surface well or remove most of the stain or varnish with a chemical refinisher.
-
Ease of Work by Removing Doors
- Take the doors off your cabinets and remove the handles and hardware. It will be much easier if you lay the doors flat to work on them.
-
Damaged Cabinets: Assessing and fixing
- Make sure the cabinets are in good condition. Generally, if there is only minor damage, such as dark stains around the door handles, these areas should be cleaned as soon as possible. It is recommended that you use a synthetic steel wool pad in order to avoid any discomfort or catching on the wood grain.
-
Cleaning and Preparing the Cabinet Surface
- Dip the pad in paint thinner, mineral spirits, or turpentine, and scrub the stains. Once the surface has been thoroughly cleaned and dulled, scrubbing lightly will enable the new finish to adhere.
-
Applying an Oil-Based Clear Finish
- After cleaning the surface and removing the dark stains, apply a clear, oil-based finish, such as Minwax. All clear finishes are low-odor, and most are available in glossy or satin finishes. For a thicker finish, apply several coats.
-
Using a Chemical Refinisher for Extensive Work
- A chemical refinisher is used if you need to redo more than just a few stained areas, as it dissolves and removes a portion of the old varnish. You can also ask a paint store expert to recommend a reliable, quality refinisher.
-
Achieving a Smooth and Even Cabinet Surface
- After you have scrubbed the cabinet’s surface, it should appear smooth and evenly colored. Alternatively, if it is not, wipe the entire cabinet with clean steel wool and clean refinisher in long, overlapping strokes. It is likely that most of the stain color will remain and the wood will be very smooth.
Before and After: Inspiring Transformations
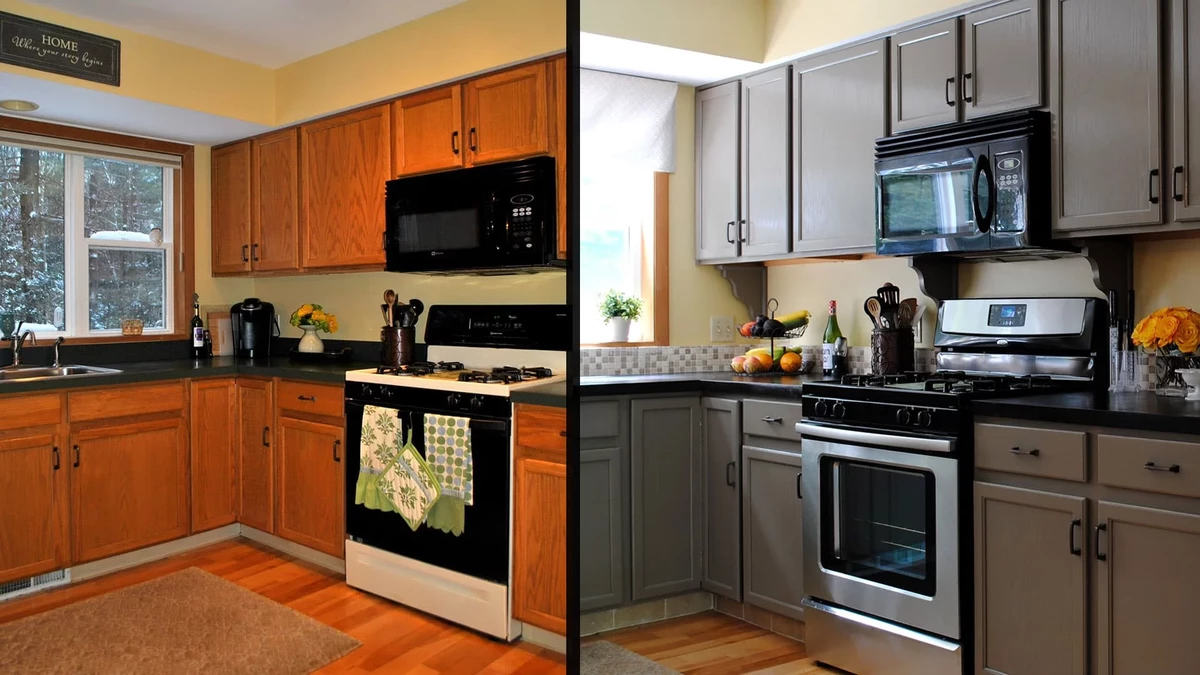
In order to illustrate the remarkable impact of restaining kitchen cabinets, let’s examine some before-and-after photos of actual kitchen remodels:
-
Before: Dull and Worn
In this kitchen, the cabinets had lost their luster over the years, appearing dull and outdated.

-
After: Elegant and Modern
The same kitchen now boasts a fresh, modern appearance after being repainted and refinished. Combined with the new countertop and backsplash, the rich, dark stain creates an elegant and inviting atmosphere.
Final Thoughts
Restaining and restoring kitchen cabinets is a rewarding DIY project that can dramatically change the appearance of your kitchen. If you follow the tips in this guide and take inspiration from the impressive before-and-after transformations outlined in this article, you will be able to give your kitchen a new lease on life.
Moreover, whether your objective is to create a contemporary, sophisticated atmosphere or to enhance your kitchen’s overall appearance, enlisting the assistance of PointVertex Construction is sure to result in outstanding results.


